

How To Install Remote Trunk Release
Best Sellers
How to Install a Center Panel Mounted Trunk Release Kit on your 2005-2009 Mustang
Installation Fourth dimension
15 minutes
Tools Required
- Apartment head screwdriver
- Phillips screwdriver
- Pliers
Shop Parts in this Guide
- Center Console Mounted Trunk Release Kit (05-09 Mustang)
Installation:
i. Brainstorm by making sure your car is off and your parking restriction is on. Remove any items that may be in your center console, loving cup holder, glove compartment, or rider side floor.
2. First, we volition remove the center console comprehend. Remove the two Phillips screws located towards the rear of the heart console embrace, and ready them aside for re-installation after.
three. Brand certain your emergency brake is equally far up equally possible in order to make it easier to remove the middle console panel. Note: the rubber boots that shroud the emergency brake lever tend to hug the lever equally you effort to remove the center console.
four. Remove the leather bezel from the shifter (manual manual) or trim bezel (automatic). This is washed by prying up gently on one corner with a pocket-size flat head screwdriver. Annotation: On manual transmissions, you lot must unscrew the shifter brawl in order the remove the leather bezel completely. While unscrewing the shifter ball, hold the leather boot in place so it doesn't get twisted up.
five. Brainstorm to carefully elevator the entire center panel. Several clips hold the console into place and they volition unsnap equally yous pull up on the console.
half-dozen. As you elevator up on the console, carefully maneuver information technology over the emergency brake lever.
Now that the eye panel cover is removed, set it aside for re-installation after
7. Remove the emergency brake access cover with a small flat caput screwdriver.
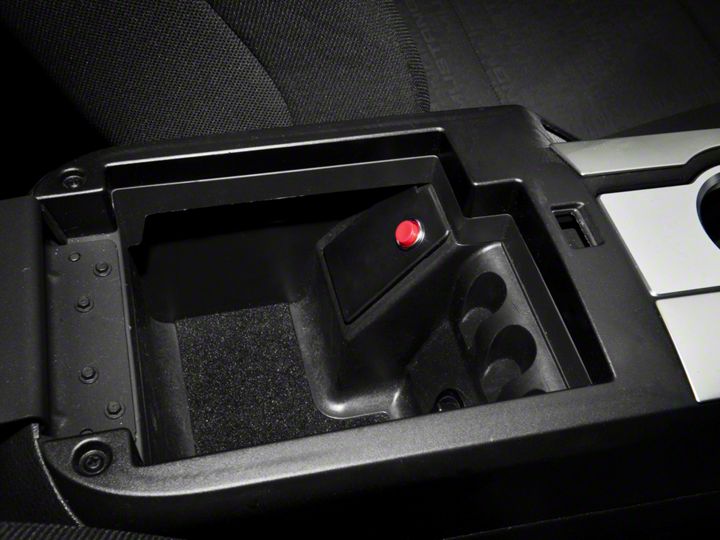
viii. Install the included emergency brake access cover (with push button) into the center console compartment. Road the wires through the pigsty vacated by the access cover y'all only removed.
9. Locate the green and black wire running under the loving cup holder area towards the center console compartment. These wires plug into the 12-volt power supply located in your centre console compartment. Place the supplied Blue wire tap onto the Black wire. The wire should sit in the heart of the two teeth. Squeeze down on the wire tap with a pair of pliers until it snaps closed. Do NOT CUT WIRE!!! Plug the Black wire from the push wiring into the back of the wire tap.
Use one or two of the supplied zippo ties to safely secure the ruby and black wires away from the emergency brake, and then as not to interfere with Eastward-Brake operation. Necktie them to the light-green/ blackness wires running to the 12-volt power supply.
Routing the wiring in the passenger compartment:
1. Route the crimson wire down the passenger side of the eye panel until y'all attain the shifter.
ii. Remove the trim console located to the correct of the radio controls. Gently pull the panel directly out equally shown in the motion picture.
three. Now road the ruby wire underneath the shifter assembly on the passenger side toward the glove box.
4. Re-install the rider side trim panel to hold the ruddy wire in place.
5. Route the wire beyond the back of the glove compartment (There is a subclass, which you can secure the wire to with aught ties). Bank check to make sure that the wire does not interfere with the glove box operation.
6. At this point remove the rider side sideslip plate that says "Mustang" or "SVT" if yous have a "GT500." Some models take this taped downward so it might be necessary to pull up firmly; you will hear it snap. Caution: this console has precipitous edges that can cut y'all, and so be careful!
vii. Pull dorsum the carpet slightly to reveal a parcel of wires. Gently skin off some of the electrical tape to reveal all the wires.
8. At this bespeak it is important to note a few things- sometimes wire colors bleed into each other over the years and it may become tougher to differentiate between the colors. Yous might as well have a tough fourth dimension seeing the colors considering the wires are very pocket-size. Lastly go along in mind that depending on the features that your car has, it is possible to take more than 1 of the same color wire. When this happens, you will always be tapping into the smaller of the two wires (the skinny 22-gauge wire).
9. Place the supplied red wire tap onto the sparse white wire with the pink stripe. The wire should sit in the middle of the 2 teeth. Clasp down on the wire tap with your pliers until it snaps closed. Practice Not Cutting WIRE!!! Note: The pink stripe on this wire may appear to be crimson or violet. On 2007 years Ford varied the color of the wire they used. If you lot find that the white wire with the pink stripe does non be or does not work, y'all will most likely demand to use the thin orange wire with the pinkish stripe. In the event that the first wire didn't work, identify a piece of electrical tape over the area that y'all tapped into.
10. Finish routing the reddish wire down to the slip plate and plug it into the red wire tap. Constrict it in behind the boot panel so that it is out of view.
Last Installation:
1. Double-bank check everything to make sure it is connected properly. Test the switch to make certain the trunk opens when pressed. If it does not, visit the problem-shooting guide below; otherwise go on to the next step.
2. Supercede the carpet then reinstall the slip plate, pressing down until it snaps back into place.
3. Re-install the centre panel encompass the aforementioned fashion you removed information technology- be sure non to bump the dash.
4. Replace the 2 screws that were removed from the center console cover during installation.
5. Replace the bezel surrounding the transmission shifter. If equipped with a manual transmission, re-install the shifter boot/ knob.
6. This kit will operate regardless of if the cardinal is in the ignition or not. Be sure not to press it while driving or else the trunk will open.
Enjoy Your Trunk Release Kit!
Trouble Shooting
Trunk does not open when push is pressed:
- Check both wire taps that you installed before in installation- brand sure both are closed completely, and good contact is fabricated with the wire.
- Make sure y'all have used the red wire tap on the correct wire- sometimes the small wires make it difficult to determine the correct wire colour. Every bit mentioned higher up, colors can bleed onto other wires over time. Apply a magnifying glass to determine the wire color if necessary.
Cannot observe the correct colour wire on a 2007/08 model year:
- In rare instances, Ford varied the wire colors on some 07/08-model years. Unfortunately, it is not possible to tell if your vehicle has been afflicted until beginning the installation. If you lot believe you have a vehicle with this effect and have already tried locating a wire matching the color pattern(s) listed to a higher place, the merely other style to place the proper wire is to locate the wire as it comes out of the SJB (Smart Junction Box). To do so follow these instructions:
one. Remove the negative cable on the bombardment to disconnect the vehicle'south power.
2. Unbolt the SJB and so you lot can gain admission to the connectors located behind it- information technology is located backside the rider boot panel.
3. Locate the C2280C connector (it is labeled with the part number C2280C).
iv. On the connector, locate pin#21- this is the wire colour that nosotros are looking for and the one that will need to be tapped into with the reddish wire tap.
Best Sellers
Word on The Street
American Muscle is a expert source for mustang parts. The site offers helpful guidance that helps inform purchasing decisions and with product installation. I would recommend AM to anyone who likes modified Mustangs.
FORD, FORD MUSTANG, MUSTANG GT, SVT COBRA, MACH one MUSTANG, SHELBY GT 500, COBRA R, BULLITT MUSTANG, SN95, S197, V6 MUSTANG, Play tricks Trunk MUSTANG, AND five.0 MUSTANG ARE REGISTERED TRADEMARKS OF FORD MOTOR COMPANY. Dodge, Dodge CHALLENGER, DAYTONA 392, DAYTONA R/T, DODGE CHARGER, SRT 392, SRT8, R/T, RALLYE REDLINE, SCAT PACK, SRT HELLCAT, SRT DEMON, T/A, PENTASTAR, AND HEMI ARE REGISTERED TRADEMARKS OF FIAT CHRYSLER AUTOMOBILES (FCA). SALEEN IS A REGISTERED TRADEMARK OF SALEEN INCORPORATED. ROUSH IS A REGISTERED TRADEMARK OF ROUSH ENTERPRISES, INC. CHEVROLET, CHEVROLET CAMARO, CAMARO, LS, LT, LT1, SS, Z/28, ZL1, AND ECOTEC ARE REGISTERED TRADEMARKS OF GENERAL MOTORS LLC.. AMERICANMUSCLE HAS NO Amalgamation WITH THE FORD MOTOR COMPANY, ROUSH ENTERPRISES, FIAT CHRYSLER AUTOMOBILES, SALEEN, OR GENERAL MOTORS LLC.. THROUGHOUT OUR WEBSITE AND Production CATALOG THESE TERMS ARE USED FOR IDENTIFICATION PURPOSES ONLY. 2003-2021 AMERICANMUSCLE.COM. ®ALL RIGHTS RESERVED

Source: https://www.americanmuscle.com/center-console-trunk-release-0509-cust-install.html
Posted by: hayesalmot1972.blogspot.com
0 Response to "How To Install Remote Trunk Release"
Post a Comment